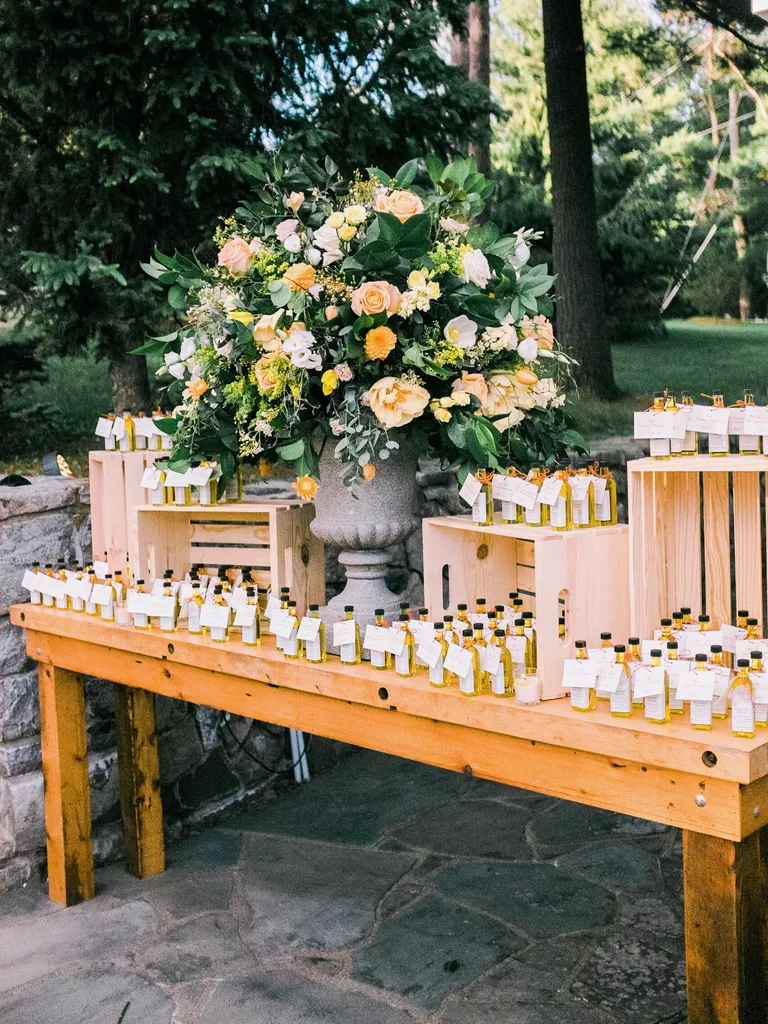
Contest Corner: The best giveaways on the net!
As Seen on KOIN 6 News - Click Here
As Seen on KOIN 6 News
Contests: How to Enter & Win Giveaways | Current Giveaways | Winners
Contest Listings | Sweepstakes Saturday | Submit a Giveaway

Popular Features: Holiday Gift Guide 2012 | Product Reviews | Recipes | Celebrity Interviews
Photography | Fitness & Weight Loss | PDX/Seaside/Local | My Life

Navigate: Categories | Archives | Search | Links
Site Info: About | Contact | Grab a Button
HOME

Subscribe

Facebook

Pinterest

Email

Twitter


Recent Highlights

Soft Scrub Mold & Mildew Stain Remover Gel Review

Soft Scrub Mold & Mildew Stain Remover Gel Review

May 21st, 2013

Living in a damp coastal area, mildew is something that you have to deal with. We just painted[...]

Father’s Day Gift Guide Coming May 28th!

Father's Day Gift Guide Coming May 28th!

May 20th, 2013

Contest Corner is pleased to announce our first-ever Father's Day Gift Guide, starting May 28th [...]

Educating Your Children On Money

Educating Your Children On Money

May 17th, 2013

The following is a guest post by Sam Peters. Consideration was received for the editing and publ[...]

Menthe Blanche Microfoliator Cleanser Review

Menthe Blanche Microfoliator Cleanser Review

May 17th, 2013

I'm always looking for ways to improve my skin care routine. I've been vocal about the fact th[...]

Ultra PestChaser Giveaway – Ends 05/31

Ultra PestChaser Giveaway - Ends 05/31

May 16th, 2013

If you didn't win our last rodent trap giveaway, don't worry: This giveaway will be of interes[...]

Scroll down to view all our recent posts!


Creating a Bachelorette Party Buffet With Tostitos #FritoFan

May 14th, 2012

Bachelorette Party Buffet!

On the afternoon of the bachelorette party, I received a box from FedEx packed full of samples from Frito-Lay of their newest Tostitos Thins tortilla chips, along with a cute tote bag. I had already planned to serve chips and bean dip for the party, so there absolutely could not have been better timing for this to arrive!

I received two new flavors of these limited-edition chips: Lime & Salt and TexMex. These chips are meant to be the ideal foil to your favorite drinks – and since I was serving margaritas and tequila shots, I couldn’t think of a more perfect compliment!

These chips were enjoyed with a hot bean dip that I made & served in the crockpot. It was super easy to make – I simply combined black beans, white beans, and a large can of crushed tomatoes in the crock pot, seasoned with red pepper flakes, garlic salt, and black pepper, then added a variety of hot sauces to taste. I cooked it on high for a few hours, then turned it to the “Keep warm” setting for the party. I provided small bowls for guests to scoop the dip into and enjoy with the tangy TexMex and refreshingly citrus Lime & Salt chips. And just when I thought it couldn’t get any more delicious…

Tostitos Chips & Dip

The guest of honor brought a few snacks when she arrived, including Tostitos Salsa Con Queso! She had no idea that I was serving these chips – it was a total awesome coincidence. Yep, we love Tostitos! :)

Tostitos Salsa Con Queso

Tostitos Thins tortilla chips are available exclusively at Target through mid-July, so hurry and pick up a bag before they leave shelves forever! You can also access fun party-planning tips on the Tostitos Fiesta 411 Facebook page.

Bachelorette Party Fun With Partida Tequila

May 14th, 2012

Bachelorette Party Bar

It’s wouldn’t be a bachelorette party without drinks, so when I was the host of a bachelorette party on Saturday, I set up a “Bar” in the living room with a selection of spirits. I had recently received a box of samples of Partida Tequila to review, so the timing was awesome!

Partida Tequila

This tequila came in three small bottles. I loved how they packaged these – the bottles and colors of the tequila looked so cute on the table and served as a compliment to my decorations!

Ice cube shot glasses

I have special ice cube trays that make shot glasses out of ice, so to kick off the party, I suggested that we do shots of Partida out of our ice cube shot glasses! Since you can’t really hold these “Shot glasses”, I stuck one each in the special wine glasses that I had made for the bride-to-be and myself.

Shots of Partida

Bachelorette Party Fun With Partida Tequila Shots!

The bride-to-be was hesitant to taste the tequila straight as she thought it would burn and be unpleasant. However, she was a good sport and humored me, so we said “Cheers!” and sampled the Partida Añejo first. We were both surprised at how smooth this was – the bride-to-be who doesn’t like straight tequila ended up sipping it over ice and told me it was really pleasant.

For the second round, we tried the Partida Reposado. This one was a little stronger, but still really good. The guest of honor said it lingered a little longer on the tongue and burned more than the first one that we sampled.

The favorite of the night was the Partida Blanco. Like the others, this was extremely smooth with a great flavor. I jotted down our thoughts in a notebook throughout the evening so I’d remember what we said about each one, and as I read through them today, I see that my notes became progressively harder to read throughout the night. ;) I did jot down that the bride said that “This one has spunk!”. We finished off the Blanco, and the next morning she took the bottle home as a souvenir, because the bottle itself was so cute that she wanted to use it as a decoration.

I was extremely impressed by Partida Tequila, not only because of its fantastic flavor and smooth drinkability, but because of the thought put into the packaging and the elegance the bottles added to the table. It was a big hit at the party and provided lots of bachelorette fun! For more on this excellent line of spirits, visit PartidaTequila.com.

Anatomy of a Fabulous Bachelorette Party

May 14th, 2012

Bachelorette Party

Recently, I showed you how I made a bunch of DIY bachelorette party crafts in anticipation of a party I was throwing. The party took place on Saturday, so I wanted to update you with some pictures so you could see how everything turned out! I set up three tables for the party:

DIY Bachelorette Decorations

DIY Bachelorette Crown

Cocktail Cupcakes

The first table I set up was to show off the centerpieces. I decorated the table with bachelorette party crafts that I made, along with a couple of cocktail cupcakes. I was pleased with how everything looked, and the bride-to-be actually didn’t realize that I had made the decorations myself until I told her. I made some comment in passing about the Painters Paint Markers, and she said, “Wait, you made these? I thought you bought them!” So my crafts must have turned out OK. :)

Also, my plan for using the tote bags as storage during and after the party worked out great. The next morning, I packed up all the bride’s souvenirs and leftover food into the “Bride to Be” and “Bachelorette Party” totes for her to take home as a practical and fun memento of the day. I would have been shoving stuff into plastic grocery bags otherwise, so they definitely came in just as handy as I suspected they might!

Bachelorette Party Bar

Shots of Tequila

Bachelorette Party Cupcakes

Bachelorette Party Fun!

The second table I set up was the “Bar”. I decorated the tablecloth with a FRAAS scarf (Which I sent home with the guest of honor the next day), the custom “Bride-to-Be” and “Bridesmaid” glasses that I had made, and more of the cocktail cupcakes. For the drinks, I set out Partida Tequila, Lulu B Margaritas, and a bottle of gin and some spirits that my guest brought. I also made use of some fun ice cube molds shaped like shot glasses!

I wondered how my custom glasses would hold up during the party, since the Painters Paint Markers didn’t say anything about being waterproof. Some of the paint chipped off during use and after washing them the next morning, but they held up better than I would have expected given that they weren’t really intended for this purpose.

Bachelorette Party Buffet!

Finally, I set up the most important table at any party: The buffet! For snacks, I served Tostitos chips with a hot bean dip. Using a crockpot makes party preparations so much easier!

For more photos and details on the party and the supplies I used, check out the following posts:

How To Make Your Own Bachelorette Party Crafts

Stocking a Bachelorette Party Bar: Partida Tequila Review

Creating a Bachelorette Party Buffet With Tostitos

DIY Bachelorette Party Crafts: How to Throw a Fun & Classy Party!

May 6th, 2012

Bachelorette Crafts

I am a member of the Collective Bias™ Social Fabric® Community. This shop has been compensated as part of a social shopper insights study for Collective Bias™. #CBias #SocialFabric #ExpressYourself

By now you should know that I love weddings and entertaining, so I get extremely excited not only by planning my own nuptials, but also participating in the celebrations of others. When one of my very dearest friends recently announced that she was getting married, my thoughts immediately turned to what I could make for her bachelorette party. As I searched the web looking for inspiration, I noticed that there were little to no tutorials for bachelorette party crafts, and the ones I did find just weren’t my style. It’s no secret that a lot of bachelorette parties are pretty outrageous, so most of the supplies and DIY ideas that I found just weren’t for me. Many people enjoy bachelorette parties centered around making the bride blush with crazy games and party favors shaped like male anatomy, and that’s perfectly fine, but for me personally I know that if I didn’t die of embarrassment first, the bride would kill me herself. ;) So what do you do if you want to throw a bachelorette party that’s fun but still tasteful? Like all great things: Do it yourself!

A bachelorette party is a unique kind of wedding celebration. While a bridal shower is more of a family event focused on getting the bride things that she’ll need for the home, a bachelorette event is more of a big party where the bride can cut loose, chat with her girlfriends and hang out while eating tasty snacks and drinking cosmos. So to make this party picture perfect, I wanted to make the theme full of glitz, glam, and girly decorations – without the chippendales dancers! ;)

Walmart

In order to create my perfect decorations, I headed to Walmart so that I could buy supplies to make my own fabulous favors.

Craft Aisle

The first thing I picked up was a package of Elmer’s Painters Paint Markers. While I was deciding what color markers I wanted, Jai had fun arranging some of the wooden letters on the shelf to spell my name. ;) Painters Paint Markers are sort of like Sharpies filled with paint, and can be used on a variety of surfaces, from glass to cloth to plastic and more. I picked up a number of items that I planned to customize with the markers to create a picture-perfect celebration. Here is a how-to for creating each of these fun bachelorette favors and decorations:

Bride-To-Be Sash:

DIY Bachelorette Sash

A “Bride-To-Be” sash is a classic accessory to put on the guest of honor before a night on the town! Here’s how I created this one:

Supplies to make a Bride-To-Be sash

Supplies:

Painters Paint Markers

2 yards of white ribbon

1 badge

Pinning the sash together with a button

I found this cute package of badges for .97 cents, and they fit perfectly with my theme. I had originally planned to make my own bachelorette-themed button, but I couldn’t find the supplies that I’d need, so this was the next best thing. I used the badge with a crown on it to secure both ends of the ribbon together to form a sash.

Making the sash

I tried the sash on so I could get an idea of where the best placement for the lettering would be. After eyeballing it, I placed these two buttons on top of the sash to give myself a rough guide.

Practice makes perfect!

I’d never used these markers before, so I practiced on paper a few times before writing on the sash itself. When they say to shake these pens before using, they really mean it!

Making a Bride-To-Be Sash

This was actually the most difficult of all the crafts which I made for the party, because of the ribbon itself being so sheer and shiny. I had a really hard time getting the paint to stay on – it soaked right through the material, so I had to make sure to put paper underneath it to soak up the paint. It was messy, but I ended up hanging it over a chair and touching up the letters section by section, allowing time for each letter to dry. The finished product will definitely work for my party, but next time I would use regular fabric as opposed to gauze ribbon with these markers.

Homemade Bride-To-Be Sash

Bachelorette Tiara:

Bachelorette Tiara

A fun crown or tiara is another common item for the bride to wear during her bachelorette party!

Foam tiara

Supplies:

Painters Paint Markers

1 foam tiara

Making a bachelorette tiara!

I found this cute foam & glitter tiara for .97 cents in the craft aisle. I really wasn’t sure how the markers would work on the glittery surface, but I was blown away by how easily the paint went on and how good it looked! All I did was write the word “Bachelorette” on the crown using a blue Painters Paint marker to contrast with the pink crown. Super easy and super cute!

Bachelorette Party Tote Bags:

Bachelorette tote bags

When I was kicking around ideas for party decor, I was inspired to make special bachelorette-themed tote bags. I really liked the idea of a centerpiece that could also be taken home as a practical favor – after all, everyone can use a tote bag, and it would serve as a fun reminder of the party. Also, bachelorette parties often entail a lot of games, accessories for the bride-to-be (Like the tiara and sash pictured above!), directions to bars, or other random pieces of paper. I kept wondering where I would keep these things during the celebration, so this centerpiece tote bag seemed like a great solution! Plus, the bride can pack up all her souvenirs and any leftover food in the bags the next morning.

Canvas tote bags

Supplies:

Painters Paint Markers

Blank canvas tote bags

Several badges

Paper

I found this package of 3 blank canvas tote bags while I was shopping in the craft aisle. I decorated them with the rest of the badges from the package of 6 that I bought, and wrote the phrases “Bachelorette Party”, “Bride-To-Be”, and “Bridesmaid” on them.

Writing "Bachelorette Party" on the tote bag

Writing on the canvas with these markers is super easy! Just be sure to line the inside of the bags with a piece of paper or two, as some of the ink may seep through.

Matching band-aids!

As a funny aside – I accidentally jabbed my thumb with scissors while working on these crafts, and had to stick a few band-aids on it. When I got back to work, I realized that my band-aids were the same exact colors as the markers I was using – totally unintentional! How’s that for color coordinated. ;)

Back of the tote bags

When I was done with the front of the tote bags, I turned them over and wrote the date that the celebration will occur as a fun keepsake of the day.

Bachelorette Wine Glasses:

Bachelorette wine goblets

Another item that I wanted to make was a special wine glass decorated just for the bride-to-be. This would serve triple duty as an attractive decoration, a glass for her to use during the party, and a keepsake.

DIY bachelorette wine glasses

Supplies:

Painters Paint Markers

Wine glasses

I found these glasses for .97 cents each in the housewares department, and I knew these would be just perfect. Now in case you’re wondering why I only made two – this party that I’m having is going to be a girl’s night in with just the bride-to-be and myself. She’s getting married in 2 weeks and will have a formal reception later in the summer, so I’ll be hosting a second bachelorette & bridal shower in the next few months when it’s easier for all of our friends to come. This small party will be a perfect chance for us to get together in the middle of everything that’s going on, catch up, and relax!

Making the bachelorette wine glasses

Making these custom glasses was easy and fun. The Painters Paint Markers went on the glass easily and looked nice. I wrote “Bride-To-Be” on one and “Bridesmaid” on the other, and decorated them with a multicolor heart motif. This way, there will be no question as to whose drink is whose. ;) Another great thing about using the Painters Paint Markers is that you can fix mistakes if you act fast enough – when I was writing on one of the glasses, I was talking to Jai at the same time and got distracted, and ended up writing “Bride To Bride”. I panicked, but I was able to quickly wipe it off with a rag and write the correct phrase!

DIY Bride To Be wine glass

DIY Bridesmaid wine glass

Bachelorette Tablecloth:

Bachelorette tablecloth

To round off the decor, I thought I’d decorate a tablecloth for the party!

Tablecloth & markers

Supplies:

White plastic tablecloth

Painters Paint Markers

Making the bachelorette tablecloth

This was super easy to make. All I did was put the tablecloth on the table I’ll be using during the party and eyeball where the cloth would fall on the front of the table. I then wrote the word “Bachelorette” on this section in large letters and added some hearts at the bottom. There were two tablecloths in the package, but as they are quite see-through, I layered them on top of each other.

My DIY bachelorette party supplies!

Tasteful, homemade bachelorette supplies!

And there you have it – my fun DIY bachelorette party supplies! The neat thing about these ideas is that they are easy to do and can be made by crafters of any skill level. I was a little concerned about how they would turn out at first – In a short period of time, I managed to smear paint all over several items, stab myself in the thumb with scissors, and spill a cup of coffee ALL OVER my craft table. However, these mishaps didn’t stop my crafts from turning out they way I hoped they would. I’m really pleased with the results and I think my little party is going to be super cute and fun!

Painters Paint Markers are now available at Walmart in both multipacks for $9.97 and individually for $1.97. The individual markers have a wide selection of colors and tip sizes to choose from, so you can find the perfect marker for your project. To learn more about this and other Elmer’s products, check out Elmers.com and follow them on Facebook and Twitter.

Wedding Wares: Designs by Lolita

April 5th, 2012

Wedding Wares

Designs by Lolita

It’s April, and you know what that means: We are officially in the thick of wedding season! Whether you’re planning your own nuptials, looking for wedding gifts for your friends, or doing both like I am ;) , you’ve likely been doing a lot of shopping for bridal items. If you’re in the market for one-of-a-kind items perfect for both decorations and gifts, then I’d like to introduce you to Designs by Lolita. This company specializes in handpainted wine and martini glasses for all occasions, offering a lovely selection of bridal stemware. I recently had the opportunity to review a complimentary “Just Married” Personalize It Wine Glass for review. These fun glasses come with a Sharpie marker so that you can customize your glass to your event or recipient.

"Just Married" Glass

When I received my glass, the first thing I noticed was the attractive & sturdy packaging. This makes it appealing for gift-giving purposes and will also make it easy to store.

Wedding wine glass

What struck me the most about this glass was the detail and how pretty it looks in person. The product photos on the website don’t do justice to how lovely and special it looks in person – I thought it had a lot more “Wow” factor once I saw it in real life! I think this is absolutely adorable, from the presentation with the mini-Sharpie to the recipe on the bottom. Each Designs by Lolita glass has a custom cocktail recipe painted on the underside of the glass; this one has the “Just Married” drink recipe!

Close-up of the detail on the glass

I’ve decided that I’m going to leave the glass as it is and let the couple I am giving this to personalize it for themselves. That way they can embellish it with whatever they want – their names, their wedding date, or any other special phrase. This would make an adorable gift by itself or as part of a gift basket.

Perfect for newlyweds!

Designs by Lolita offers everything from gifts ideal for bridal showers and weddings to mementos for your bridal party and decor for your big day itself – after all, these personalized glasses would look lovely on a reception table. No weddings? No problem – Designs by Lolita also carries a variety of glasses for other occasions, including birthdays, anniversary, graduation, and many other designs. Prices range from $9.99 to $24.99 – visit DesignsByLolita.com or TheLolitaStore.com for purchasing information.

Put a Ring on It With Kranich’s Jewelers

February 26th, 2012

Wedding Wares

Kranich's Jewelers

One of the most exciting parts of wedding planning is ring shopping. Although you probably already have an engagement ring, you will most likely be shopping for a his and hers bridal set at some point. There’s a lot to consider during this process: What will match your engagement ring? What will fit your budget? Which ring best suits your personal style?

My engagement ring

This is a photo that I snapped of my engagement ring a few days after we got engaged. (Side note: It can be challenging to take a photo of your own hand!) Since my ring has a distinctive look, I’m not sure what would go best with it as the wedding ring. But searching through ring styles is one of the best “Tasks” associated with getting married, am I right? ;) I recently got a chance to peruse the website of Kranich’s Jewelers and thought it might give me some inspiration. Kranich’s is a well-known name in the jewelry business, founded in 1903. They have a wide selection of wedding sets, so I browsed through the site and daydreamed about what kind of wedding band I might end up with.

Men's yellow gold engagement ring

One of the sections of the website that I checked out was Ritani Engagement Rings. Ritani Bridal offers all manner of rings for your big day, and they have some simply lovely pieces. Most of their bridal rings are in white gold, which wouldn’t match my engagement ring. I’ve noticed this to be a common trend in bridal jewelry – at least in the places I’ve looked – so I may need to look a little harder to find the perfect ring, both for myself and for Jai. The picture above is the only men’s wedding band from Ritani that includes yellow gold. Still, I absolutely adore my engagement ring and I wouldn’t change it for anything else, even if it means it won’t be quite as easy to match. I love yellow gold, and it also matches my mom’s simple gold wedding band, which I’ve worn on my pinky finger every day since she passed away. Yes, you read that right, I wear her wedding ring on my pinky – she had very slender, small hands. In fact, when I got my engagement ring sized, the jeweler actually enlarged my mom’s ring while he was at it, so that it wouldn’t fit so tightly on my pinky!

Princess Cut Diamond Ring

While I was on the site, I did find a couple of Princess Cut Diamond Rings that could possibly work. This one is pretty – I’m not crazy about it being two-tone, but I think a ring with this kind of cut could work well with the shape of my engagement ring. What do you think, readers? What style ring would you pick for me?

Wedding Wares: Engagement Photos by Stephanie Kaloi

December 9th, 2010

Wedding Wares

Being engaged is one of the most exciting and memorable times in your life. One way to commemorate this special time is to have engagement photos taken. Engagement photos can be used for newspaper announcements, save-the-date cards, and even in your wedding decor. So when Stephanie Kaloi of White Rabbit Studios asked if I would like to review her photography for Wedding Wares with an engagement shoot, I was very excited! White Rabbit Studios is based in Huntsville, Alabama, but Stephanie was making a special trip to Portland, Oregon during the first week of December. We live about 2 hours away on the Oregon coast, so we arranged to meet up at Cathedral Park in Portland.

Getting our engagement photos taken turned into quite an adventure! We were scheduled to meet up on the afternoon of the 5th, so Jai and I drove down to the location in Portland and prepared for our photos. However, there was a crazy mix-up because Stephanie accidentally wrote the wrong day on the calendar, so we had to cancel the shoot. She felt so terrible about the mishap that she rented a car and drove down to Seaside on Tuesday to take our photos instead.

Standing in Battery Russell at Fort StevensStanding in Battery Russell at Fort StevensStanding in Battery Russell at Fort Stevens

Click on the thumbnails to see the images full-size

The photoshoot ended up being a really memorable, unique, and fun experience. This was Stephanie’s first visit to the coast, so she brought her husband and little boy, and we had a sort of photo-journalistic tour of Clatsop County. In true Pacific NW fashion, it began raining the second Jai and I walked out the door to meet Stephanie, so we decided to seek shelter in Fort Stevens’ historical Battery Russell building. Battery Russell was built in 1903, and was used by the military until 1944; this was the only location in the continental US to be attacked by Japanese forces during WW2. We stood inside the elaborate concrete bunkers, which made a striking contrast to the gray clouds and drizzle. Definitely not your average engagement photos – and totally fitting for us!

At Battery Russell

Near Fort Stevens is the Peter Iredale shipwreck. The ship ran ashore in 1906 and became embedded in the sand, so it was impossible to remove. The shipwreck has since become a popular tourist attraction. We stood on the beach with the raging stormy waters and shipwreck serving as a backdrop.

Standing in front of the Peter Iredale shipwreck

Jai & I

From there, we drove up to the Astoria Column, a magnificent structure which overlooks a beautiful panoramic view of the city. At this point, the rain and cold were too much to take any photos outside, so we went inside the column and got some unique perspective shots:

Inside the Astor Column

Inside the Astor Column

The whole photoshoot told a story, and was an adventure in and of itself. Because of my knee injury, I’ve had to start using a wheelchair when I have to walk long distances, so Jai pushed my chair up the ramp to get on top of Battery Russell and to various other locations to snap the photos. I was determined to wear a pretty outfit regardless of the weather, so I was absolutely freezing in my paper-thin summer dress (the temperature was around 40 degrees), and the pouring rain added to the chill and made my perfectly styled hair poof up. But it all added to the uniqueness and experience!

You can view the full set of photos on Flickr by clicking here. I also shared my tips for frugal engagement photos in an article on Super Coupon Girl, which you can read here. The photoshoot was also filmed for The Love Story, so stay tuned for a behind-the-scenes video of our coastal adventure!

Welcome, Love Story Readers!

November 30th, 2010

Planning a Frugal Wedding

I want to extend a warm welcome to those of you who are visiting from The Love Story today! Here you will find a list of all the resources and products shown in my videos. Got a question or have a frugal wedding tip to share? Click here to email me!

Planning a Frugal Wedding: Part One

Click here to watch Planning a Frugal Wedding: Part One

Frugal Wedding Tip #1: Look For Freebies:

I share wedding-related freebies whenever I find them on my other blog, Super Coupon Girl, in my “Planning a Frugal Wedding” column.

Frugal Wedding Tip #2: Enter Contests

As you can tell, entering contests is my passion! I list giveaways right here on this website – check out my Contest Listings and Sweepstakes Saturday for a continually updated list of new contests. I also host my own contests: click here to see a full list of all my current giveaways! Additionally, I am putting together a series of how-to articles explaining how to enter contests and maximize your odds of winning – so be sure to check back for those as well.

Wedding prizes featured in the video:

Bouquet jewels from NorthWest Bridal – you can find NorthWest Bridal’s Etsy shop by clicking here. I won this prize on the Wedding Warrior blog, run by the lovely Keonte’, who also blogs over at Mommy2K.

Thank You Cards from Kiss & Tell Cards – you can find Kiss & Tell Cards’ Etsy shop by clicking here. I won this prize on the Indie Wedding Guide blog.

Planning a Frugal Wedding: Part Two

Click here to watch Planning a Frugal Wedding: Part Two

Frugal Wedding Tip #3: Review Products

I mentioned some resources for aspiring reviewers in my article “How to Throw a Sponsored Party”.

Wedding items I have reviewed:

Name Maker Woven Labelsclick here to visit Name Maker’s website. Click here to read my review.

24 x 36″ Vinyl Wedding Banner from Uprintingclick here to visit Uprinting’s website. I hosted a giveaway for a custom banner last year and also received a code to make one of my own!

“Welcome To Our Wedding” stencil from The Simple Stencil – click here to visit The Simple Stencil’s website. Click here to read my review.

Frugal Wedding Tip #4: Shop Garage Sales

Don’t dismiss rummage sales and local thrift stores – you never know what treasures you might find. And there’s always Craigslist, too!

Wedding Wares: Name Maker Woven Labels

October 27th, 2010

Wedding Wares

Name Maker

I’m always on the lookout for unique products that I can customize for my wedding. So when I ran across Name Maker’s products, I was intrigued. Name Maker offer a variety of customized items, and cater to brides with an assortment of wedding favors, gift wrap, and personalized ribbons, stickers, and labels. They offered to create a complimentary set of customized woven labels for me, so I decided to have them printed with the phrase Our Wedding Day, Jay & Beeb. For the designs, I chose this charming bird label and this label with hearts.

Sample label

When my package arrived, I was eager to see how my labels turned out!

Our custom wedding labels!

Close-up

Close-up

Aren’t these just adorable? I’m thinking that I’ll probably have these sewn into the bridal party’s outfits – wouldn’t that be a cute way to add a personal touch to the clothes? These could also be used to decorate gifts or favors. Either way, they will add a sentimental touch to help my loved ones remember this special day long after it passes.

Name Maker’s custom woven labels are available online, starting at $16 for 20 labels.

Wedding Wares: The Simple Stencil Review

February 16th, 2010


As a bride-to-be, I thought it would be fun to chronicle my journey in wedding planning and share some of my bridal product picks with you. A wedding can be an overwhelming experience to plan because of the limitless options. What color should the flowers be? What kind of ties should the groomsmen wear? Should we give out mints or bubbles for our favors? Do we even need favors? Wedding Wares is my new column dedicated to everything you need to say “I Do” in style – and without turning into Bridezilla!

Jai and I got engaged one year ago, but we’re still in the early stages of wedding planning. I’ve been waiting all my life to plan my big, fabulous dream wedding – I used to sketch ideas for bridesmaid dresses when I was a child – so I really want to enjoy the process. To me, picking out invitations, coordinating colors, and all those other details are exciting to think about. I refuse to rush the process, because I don’t want to be cheated out of any of the fun!

One of those fun details is picking out decor items. I don’t have a venue selected yet, so I haven’t purchased any major pieces, but I have picked up a few small items that will work regardless of my final decor theme. So when The Simple Stencil offered me the chance to review one of their vinyl wedding decorations, I knew it was a perfect fit.


The Simple Stencil offer a variety of vinyl lettering and wedding monograms that can be applied to walls, windows, and more. The piece I chose to review was this “Welcome To Our Wedding” stencil, customized with our names at the bottom:


There are three transfers included in the kit: The “Welcome to”, the “Our Wedding”, and the bottom part with the customization – you can add both your names & the wedding date, if desired. The “Welcome to” and the customization are in maroon block letters, while the “Our Wedding” is in black script. Since it’s provided to you in three parts, you can position it exactly where you want it. They say that the stencils are removable, so it sounds like you could use it on the wall of your reception hall without issue. They recommend that you use the stencil within a year of purchase, so I will probably place it on a block of some sort, similar to what you see in the example picture above – I think it looks really pretty with the flowers around it, and it would be the perfect accent for a guestbook table. Here is our stencil as it looks right now, pre-transfer:


For more custom wedding decor, check out The Simple Stencil. Right now, you can save $50 when ordering over $250 worth of product by using coupon code WED50, or save 10% off any order amount by using coupon code SS2.